
You can set up a personal website as a public exocortex with no code in this 15 minute guide, using entirely free services to host your site on the web.
All pages are converted from simple, non-code Markdown syntax, so you can focus purely on writing. The end result will look identical to this page.
Background
Github will be used as a cloud content management system - it’s convenient to upload updates to, accessible and editable from anywhere, and keeps full version history of changes as well as provides easy options for back-up.
Netlify will be used to deploy the files stored on Github as a web-server - it’s fast and automatically updates whenever an update is made on your Github repository. Github does offer its own static webhost, but Netlify is necessary due to certain plugin support limitations.
Netlify will also provide your site a custom subdomain, e.g. [site-name].netlify.app. You can also use your own purchased domain.
All services are entirely free besides the custom domain.
Deploy your own Exocore to the Web
Create Github Account
First, create an account on github.com if you do not already have one. Remember to make your email private in settings.
Continue below when you have an account ready.
Install the Exocore template to GitHub and Netlify
Open our One-click installation.
Steps:
- Select
Connect to Github - Login to Github and select
Authorize Application - Name your repository - this is your own reference
- Select
Deploy site
Netlify will now take about 5 minutes for the initial build of the site. If you want, you can watch the status of the build by clicking Production: master@HEAD under Production Deploys.
Once it’s complete, the Production status will change to Published, and you will be able to click the [site-name].netlify.app link to see your site.
The site’s master files will also appear in your Github account, under the repository name you selected, e.g. github.com/account-name/repository-name. Changes here will go live on the site automatically.
Your site is now officially live, available for anyone to view at [site-name].netlify.app., but there are some settings we should adjust before moving forward.
Change your site name
Change the default generated site name to whatever you’d like by navigating to Site settings > Site details > Change site name. It will be available at [sitename].netlify.app
Optionally, you can find instructions for setting up a custom domain [[here|custom domain]].
Clone your repo and set to ssh
First, download Github Desktop if you don’t already have it.
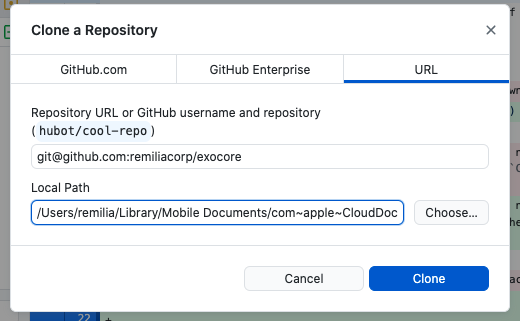
Open the program and follow the instructions to sign in to your Github account then click Current Repository at the top left, then Add > Clone Repository...
Now enter git@github.com:yourusername/reponame.git replacing your github username and repo name, e.g. git@github.com:remiliacorp/exocore.git, and where you want to store your exocore (if you want to edit on mobile this will need to be on a cloud drive like iCloud, see [Exocore Installation Instructions#Optional Setup Mobile Editing|7. Setup Mobile Editing])
Change repo to ssh
If you’ve already cloned your repo before, you’ll need to make sure it’s set to ssh, not https. If you haven’t, continue onto Setup SSH with Github
Navigate to the repo on Github Desktop, then click Repository > Repository Settings in the menu bar.
If the Primary remote repository (origin) begins with git@github.com: you’re on ssh already and don’t need to do anything. If it begins with https://github.com/ simply replace that excerpt with git@github.com:.
eg https://github.com/remiliacorp/exocore.git becomes git@github.com:remiliacorp/exocore.git
Setup SSH with Github
If you don’t already have an SSH Key, you’ll need to make one to add to Github. If you do move directly to [[Using Exocore on Obsidian#Add SSH Public Key to your Github|Add SSH Public Key to your Github]]. If you’re not sure, you can run ls -al ~/.ssh in Terminal to check, if you see id_rsa and id_rsa.pub you can continue to [[Using Exocore on Obsidian#Add SSH Public Key to your Github|Add SSH Public Key to your Github]].
Generate SSH Key
-
Open Terminal on OSX or Linux (Git Bash on Windows).
-
Paste the text below, substituting in your GitHub email address:
ssh-keygen -t rsa -b 4096 -C "your_email@example.com"
This creates a new SSH key, using the provided email as a label.
> Generating public/private algorithm key pair.
-
When you’re prompted to “Enter a file in which to save the key,” press Enter. This accepts the default file location.
Enter a file in which to save the key (/Users/you/.ssh/id_rsa): [Press enter] -
At the prompt, type a password that you’ll remember.
Enter passphrase (empty for no passphrase): [Type a passphrase]
Enter same passphrase again: [Type passphrase again]
Add SSH Private Key to the ssh-agent
- Ensure the ssh-agent is running.
$ eval "$(ssh-agent -s)"
You will see an output that looks something like:
Agent pid XXXXX
- Next, add your SSH private key to the ssh-agent.
ssh-add ~/.ssh/id_rsa
Add SSH Public Key to your Github
- Copy your SSH public key to your clipboard.
OSX/Linux: pbcopy < ~/.ssh/id_rsa.pub
Windows (Git Bash): cat ~/.ssh/id_rsa.pub | clip
- Login on Github and click your profile photo, then click Settings.
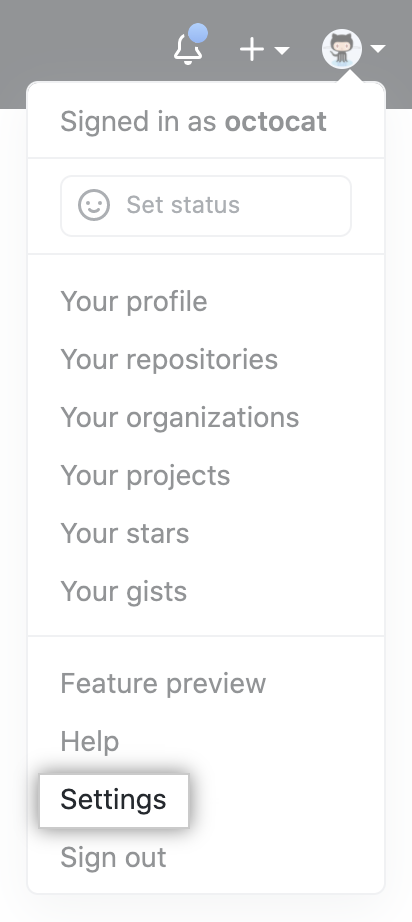
- In the “Access” section of the sidebar, click SSH and GPG keys.
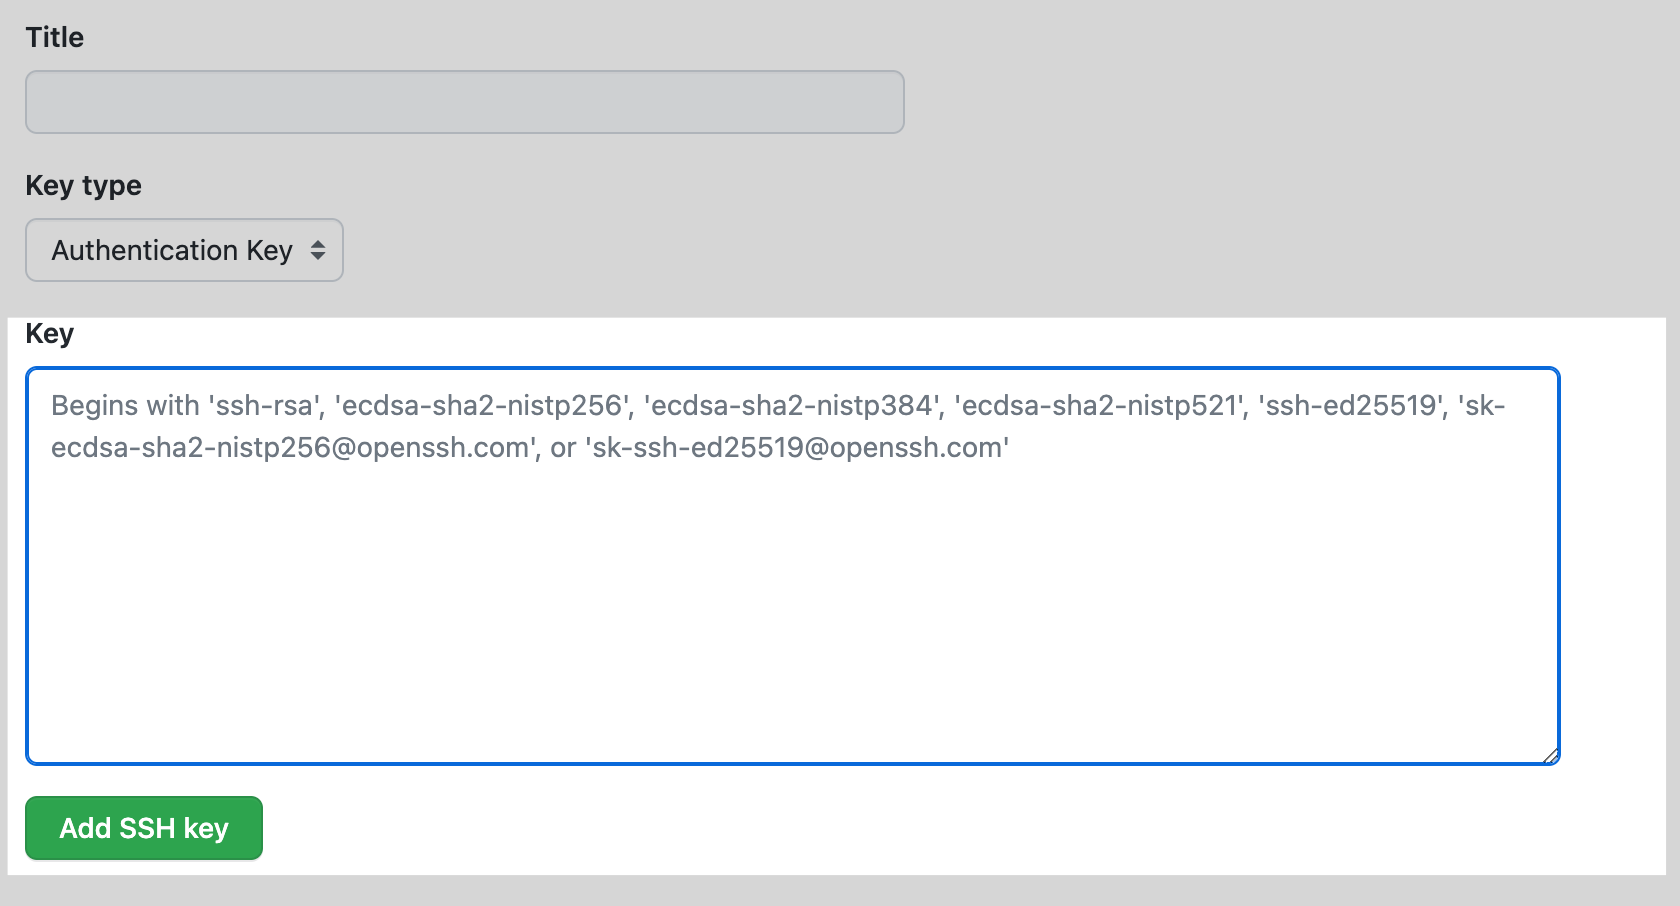
- Click New SSH key or Add SSH key.

- Give it a Title. Under Key type select: Authentication.
- Past the key into the “Key” field and click add ssh key
Install and Setup Obsidian
Download Obisidian on your PC.
Select Open a Folder as a Vault and select where you saved your exocore. Click Trust authors and enable plugins.
By default, changes are saved 10 minutes after no files have been edited to prevent publishing while you’re making corrections.
You can adjust this setting by clicking the gear icon in the bottom right, then scrolling down to the bottom of the sidebar and selecting Obsidian Git:
-
Vault backup interval (minutes)- how frequently you want to changes to be saved automatically. Set to 10 minutes by default
Also relevant if you plan to be editing on mobile is Auto pull interval (minutes), how frequently you want to sync with any changes to the exocore from another source. 10 minutes is reasonable, you can set this lower if you’re frequently moving back and forth from phone to PC. Make sure to set the Vault backup interval lower too if so.
Remember that you still control what is actually publicly published on the public site with the published: true/false tag at the top of each file.
Configuring your Exocore
- Navigate to
/exocore/data/user.ymlto change your username. - Navigate to
/_config.ymlto change the Title and URL of your exocore. - Change the profile picture in the sidebar by replacing
assets/img/pfp.pngwith a square profile picture of your choice.
Each step explained in more detail with more personailzation options including changing themes at configure exocore for personal use.
Optional: Setup Mobile Editing
Obsidian has a good mobile app if you want to do mobile editing, but you’ll either need to store your Exocore on a cloud service such as iCloud or Google Drive to get the files on your phone, or pay $10/mon for Obsidian Sync. The exocore is entirely text so it is very lightweight, the standard cloud drive 5-15GB free tiers all have more than enough to storage unless you’re hosting many PDFs or large files.
You’ll need to download their respective apps to point Obsidian to them on your local drive on both PC and mobile. For example, with Google Drive, you just download Drive for Desktop and Drive for Android and login and your files will be accessible on the Obsidian apps.
Warning: For iOS, you will need to use iCloud storage, Apple doesn’t support other cloud storage solutions. If you’re familiar with git workflows, you can also sync with Git using Working Copy or iSH as an alternative to iCloud.
Using your Exocore
Continue on to using your exocore to familiarize yourself with the editor interface and begin writing new notes.